Thursday, November 9, 2017

New Location, New Chickens

When we moved from Prineville back to Roseburg it really hurt having to give up my chickens. I knew when we would finally find our new place I would get chickens again. But I learned that I would not have roosters again. I would just get a bunch of different breeds known for colorful egg laying and hardiness.

I had to figure out a good place to have the new coop and run (singular rather than plural, as in Prineville). I wanted them to be close to the house so it would be easy to keep an eye on them, gather eggs, feed and water them.

I settled on an area behind the house, in the area that used to be the previous owners' dog run. We had dismantled the fencing there and Bill scraped an area as flat as possible with the tractor. My plan was to make the run similar to how I did it before, with cinder block under the panel fencing that I would build. The run is about 16' x 17'. I also had to make the coop bigger, so I made it 4' x 6'. The other differences were I made the fencing panels with 1/2" square hardware cloth from top to bottom. And the next boxes were going to go inside the coop. I was also planning on having a netting material across the entire top of the run because of the multitude of hawks and other predators that could possibly climb the fence (raccoons come to mind...).

I built everything in the shop. Even though I had a plan on paper somehow I managed to mess up some walls. I don't know how it happened but I ended up swapping some walls and when I realized my mistake I had to make a new plan. It all worked out.


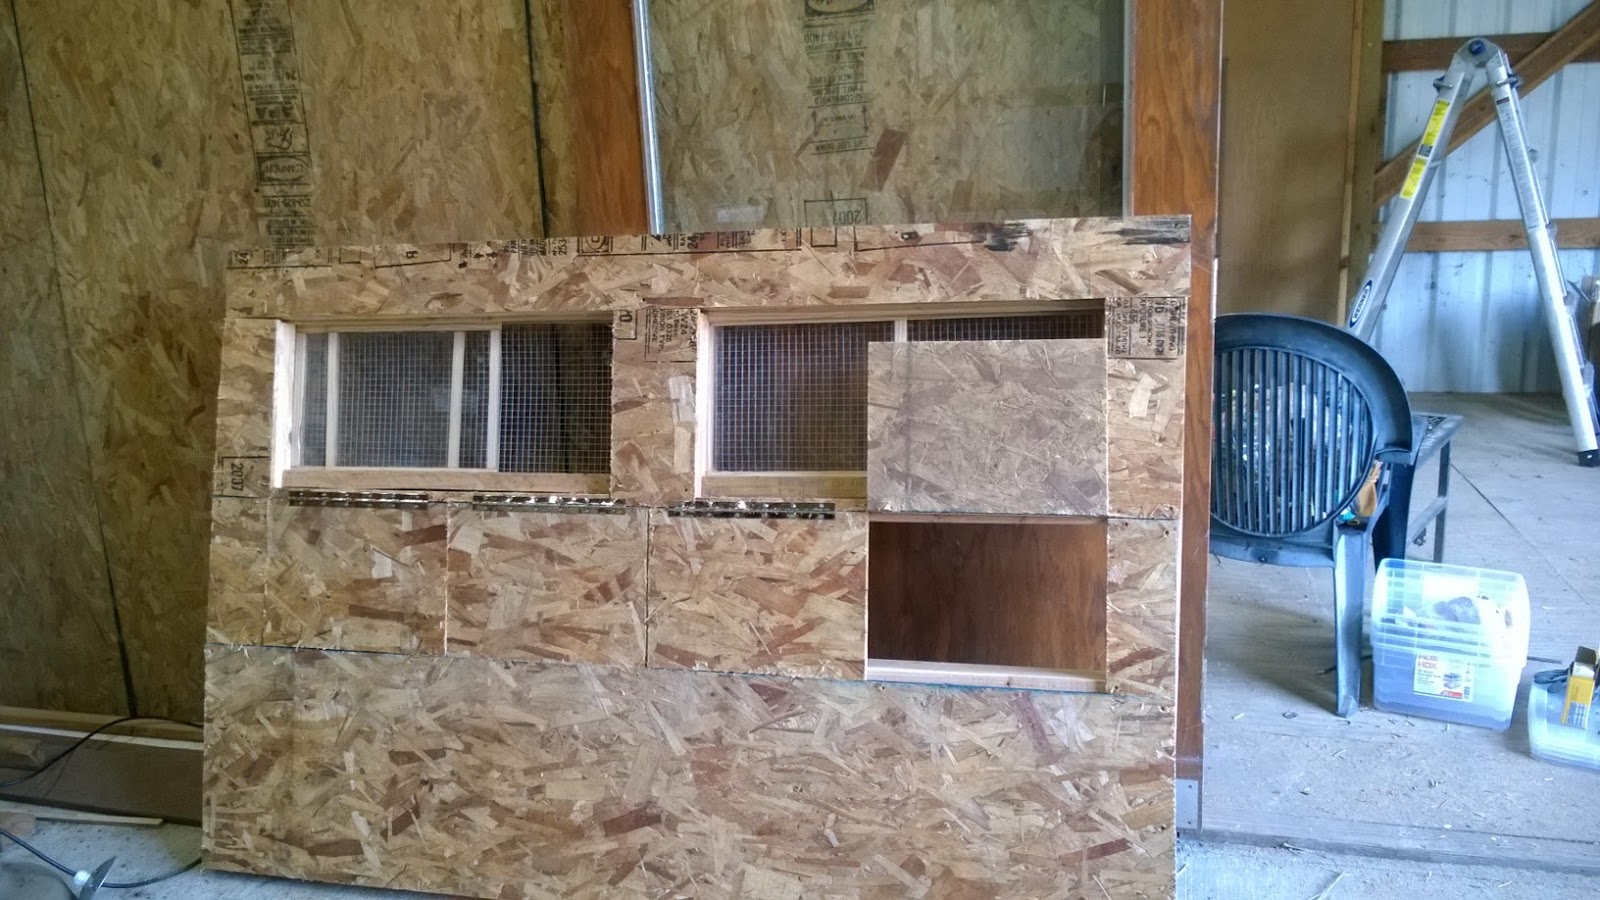
Another area I messed up. I originally had these sash type windows and this wall was going to be the end wall that would open to allow cleaning. It ended up being way too heavy so I made a new wall/door.

I tractored the pieces to the building site and started putting them together. The only problem I really had was getting the large door to hang properly, something I still have problems with. It does the job okay though, so I'm not fretting it. I enlisted the help of Bill, and friend Dave to help place the roof on.

Here is the interior before I built the nest boxes. The door for the chickens to go into the run is opposite.


What I had not anticipated being so difficult was digging the trench for the cinder blocks to go in. In Prineville the soil was rather sandy so it wasn't difficult. Here the ground is clay and it is virtually impossible to dig it out without heavy equipment. We got about two feet along but it was ridiculous so I filled it back in and decided to try and keep everything on top as best I could. 

You would think that laying the blocks end to end and then making corners it should be easy to make the yard square. I did the best I could. Our son came to visit and I enlisted him to help me with the finishing touches. He helped put build some fence walls, put them all together, and then put the garden netting across the top of the yard. 

I filled some of the cinder block holes with dirt and planted easy-care flowers. There are petunias, marigolds, some lavender, and some others I can't remember what they are.

Here you can see the new cleaning door.

Two sides don't have plants. Maybe next year.


I had my list of chickens that I wanted to order ready for a long time. I finally was able to order them and waited impatiently for them to arrive. My requested date was April 24. They arrived on April 26. Unfortunately there were a few casualties. I had 48 hours to report any further expirations. By the end of the 48 hours I had to report four deaths  It may sound a bit morbid but because I couldn't tell which chick breeds were which I snapped photos of their little bodies which I sent to the company. They told me what they thought they were from the photos and refunded me.

This is when they were "teenagers". Some are easy to id, others were still not so much.


My granddaughter has become something of a "chicken whisperer". She has a few favorites that come running to her. She actually made a chicken harness that this one (blue splash marans) lets her put on and they go for a walk.


They started laying eggs right on schedule at six months of age. Not all of them, but at least 2 started laying regularly. They were green and light brown eggs. Then we started getting a dark green egg, and just recently we started getting blue eggs!

They aren't all laying yet but we are getting plenty. 

I added a couple sheets of corrugated roofing. The rainy season is here now and the pen was getting really messy.

I am going to have to make one major change to the coop. I'll have to build the nest boxes so they are outside the coop (like in Prineville). With the boxes on the inside they get dirty way too fast because the hens won't roost on the roost I built for them but on the edge of nest box dividers. 

My work is never done!


Tuesday, November 7, 2017

2017 Hard Apple Cider

We just finished bottling our hard apple cider for this year. Last year turned out ok, just kind of dry for our tastes. This year we are trying a slightly different recipe and back sweetening in a different way as well.

Here are just some of "tools of the trade". Bottle washer, air locks, tubing. We also have gallon jars, food grade plastic buckets, bottle caps, bottle capper.

I'm not going to go through the entire process, but I'll touch on the highlights. We picked our apples this year from a local U-pick, Lehne Farms (about 80 lbs, half golden delicious, half red delicious). After juicing we added the yeast and put it in the big plastic bucket to start fermenting. After about a week we put the juice in the gallon jugs with the airlocks to continue until the yeast ate up all the natural sugars..

When the jars were no longer bubbling throught the airlocks we siphoned it back into the big bucket, added some stuff to totally kill any possible leftover yeast. We let it sit for a day or two. Now we're getting close to the end.

We did a taste test and it was incredibly dry! It was time to do the "back sweetening". Last year we added a bit of sugar to each bottle before filling and that helped to make it a little sweeter and made it "sparkling". This year the sparkling aspect was not so important to us. We wanted to make sure the flavor was more to our liking. 

We added three cans of frozen apple juice concentrate. Still too dry for me, so we ended up adding a cup of brown sugar. Finally it was not mouth puckering!

The next day we got all the equipment and bottles out. The bottles were soaked to remove the labels, then scrubbed with a brillo pad to get the remaining residue off. Then the bottles were placed in the dishwasher to be sterilized.

We got a new bottle filler this year which was really cool. It attaches to the end of the tube and once you have your siphon going as long as the filler is pushed against the bottom of the bottle the liquid flows. As soon as you lift the filler off the bottom of the bottle the liquid stops flowing. It made for a much less messy fill.

Once the bottles are filled and the caps were put into boiling water for five minutes it was time to cap. This year we got 29 full 12 ounce bottles and one almost full.

The bottles were wiped down and it was time for this year's label. This year's label features our Irish Dexter bull, Dakota. Did you know the "glue" to put the labels on the bottles is milk? Just a little trivia I learned during last years' bottling.


Monday, November 6, 2017

Huckleberries!

Ever since we've lived in this area (including the time before we moved to Prineville) we've taken little day trips to different areas to explore. I can't even tell you how many times we've driven this road and passed these bushes. To us they were just forestry undergrowth. That is, until late last summer when Bill went up on his own for a chukar hunt.

I don't think he got anything on that trip but he did pass by some elderly people that were in the bushes. They had containers strapped to their waist and were busy picking away. Bill stopped and asked what they were doing and they said they were picking huckleberries!

When he got home that day he told me about it and we decided to go back up and see if we could get some for ourselves. Truthfully I never knew what a huckleberry was before then. I think the first time I ever heard that word was on a cartoon when I was a kid (Huckleberry Hound!). And then of course the famous line from Bill's favorite movie, Tombstone, spoken by Doc Holiday (Val Kilmer), "I'll be your huckleberry."

I found out that huckleberries are almost like little blueberries. They look practically identical except for the size. They have a really nice sweet-tart taste. I almost think better than a blueberry.

We drove up the road and found a couple of likely spots. Nobody else was around so we parked the car and got our containers. 

Here's Stella peeking out from a huckleberry bush. "I'll be your huckleberry." I showed her how to eat them off the bush. I'm not sure that was a good idea!

More bushes. Stella in the background.

I'm not sure how long we were there but it was quite a while. It's not hard to pick the huckleberries, just kind of tedious.

This is our haul from about 90 minutes.

When we got home I spread them out in a single layer on parchment paper on sheet trays and stuck them in the freezer. When they were frozen solid it was a simple matter to transfer the berries to freezer bags then back to the freezer for future use. 

Delicious use!

Sunday, November 5, 2017

My Cross Country Jumps

When we were looking for a new house one of the reasons I wanted at least 20 acres was to have my own mini cross country course. This property was very dense with forest and an overgrown perimeter trail. That trail was virtually unrecognizable as a trail at all.  

We decided to do some selective logging to thin it out and make a little money at the same time. The good news about the logging is we made enough money to do a total redo on our master bathroom! Plus the forest was thinned considerably so we are not in darkness 24/7, and by virtue of the log skidder we got a bunch of new trails. Once the logging was done Bill put the tractor to work and improved the roads, cleaning and smoothing.

I wanted to put some jumps along the trails but I didn't want to completely block any road. I had to find areas that weren't too steep for a jump and had enough room for the tractor to drive around if it came down that trail.  There aren't a lot of those types of areas in the wooded parts but I did find a few.

The jumps I built are not permanent and they are extremely amateurish. I'm getting a little better and eventually they will look a little more professional, especially with the abundance of materials we have.

This was one of the first ones I made. The pictures on the left are uphill and the ones on the right are the same jump headed downhill. This was just some skinny logs I pulled off a slash pile and propped up on the ends with smaller sticks. (I know it's hard to see here so remember you can click on the photos to enlarge.)

The second jump I made out of bifold doors we pulled off one of the closets in a bedroom. Bill wanted to throw them on the burn pile but I could see them as more than trash!  :-)

The next one is made out of two pickup wheels that are no longer in use. They are an odd size that is no longer manufactured and I knew I could use them somewhere in a jump some how.  The first three are definitely baby novice size jumps, maybe 12" to 18".

So these next two jumps are a tiny bit more challenging, though still very inviting to jump. Just for a little background info many, many, many years ago I had one bad fall where I broke my collarbone. Just a couple years after that I had another accident, even worse, and broke the other collarbone. Since then I've been a little timid about jumping, though I still love it. The more I've been jumping again the bolder I'm getting again. I'm happy to jump the baby novice size, though I'm progressing to beginner novice/novice height. I even did a 3" verticle in my arena not long ago!

This jump is made with a long piece of 6" x 8" (I think those are the dimensions) lumber and shorter chunks of the same left over from the making of the covered arena. This can be easily adjusted in multiple ways, by removing the chunks (there are three chunks under each side), and changing the side the big piece of the chunks are on (placing them on the 8" side or the 6" side).

This is the one I think looks like a jump you'd see on a real cross country course. It does need a little work to make it look even better, but I'm not ready to make a more permanent jump yet. This one is on a bit of a side hill (it actually looks worse than it is) and I even put a couple of side poles. Those are probably what makes it look more authentic.

I have some ideas of making a bank or drop jump, kind of like we had in Prineville. The ideal spot for that would be in the bottom pasture. There's also lots of room down there to make some other jumps. We do have a couple of telephone poles we can use so all my jumps aren't all logs.

A little at a time and I'll be able to jump more than just the same old five jumps over and over.