
Wednesday, November 22, 2017
Bees
When we were in Prineville we explored the possibility of getting a box of bees. We took a class together for beginners and it sounded like it could be fun. I was a little scared of the idea because these are insects, not big warm blooded mammals, and I had absolutely no idea how to take care of them. But the class was very positive and we agreed that we would get a box of bees. Eventually.
Things didn't work out for getting the bees while we were in Prineville but we didn't give up on the idea. Earlier this year a local feed store had a bee class (because they sell them) and I went. It wasn't as good as the first class we went to because there were those people that always want to ask a bazillion questions, usually about things that have either already been covered or have not been covered yet. And because it always goes off on a tangent the lecturer never got to finish his presentation.
The good news was there was a very generous door prize session in the end with a lot of prizes. I actually won a prize. I got my choice of what was on the table and I chose the bee smoker.
Anyway, long story short we ended up ordering a box of bees. We got the ten frame nuc (nucleus), Italian queen bee, and a whole bunch of her subjects. They weren't inexpensive. When the time came to pick them up from the store we eagerly, if not gingerly, brought the box home. We had a place all set up for them in the orchard area on the south side of the house.
There was a piece of foam blocking the entry slot and we carefully pulled it away. It took a while but soon the bees were buzzing about.

We checked the bees every so often. I really didn't know what I was looking for but at least I could tell the bees were very active and they were making things on the frames. I never did find the queen but I was sure she was in there somewhere. I felt they wouldn't be so active and building stuff if things weren't good.

We may not have checked them often enough. I've read new hives should be checked once a week. I think we checked once a month. Like I said, I didn't really know what I was looking for, other than to look for the frames getting filled.

Things seemed to be going very well for the first several months. The frames were really getting full.

I had also read that when the first brood box gets full it was time to add a second one or else there was a chance the bees would leave the hive in search of more space. So we got a second brood box and added it to the top of the first.

Several more weeks went by and then we started noticing wasps and bald hornets near the hive. This really scared me because I knew it could not be good. We set up several traps in the area. We also found a couple of bald hornet nests and got rid of them (I'll do a post on them another time).
I checked the bees a couple times to make sure they still were active. They seemed fine and were definitely building in the second box.
Three weeks after I checked the bees there was no activity. At all. We opened the box and there was nothing. Just some wax on the frames but everything else was gone, including the honey.
I have no idea what happened. Did we add the second brood box too soon? Did they just get overcome by the hornets and wasps? Did they leave and go wild?
I have a terrible feeling it may have been the hornets and wasps.
I'm not sure if we are going to give it another go next year. After all we do have all the equipment already, so all we would need to do is buy the queen and drones. Still not cheap though. And there is no doubt that we do have a wasp and hornet problem. When we first moved here there were tons of wasps but we worked really hard to eradicate them. The difference between then and now was remarkable. But obviously they are still a problem. Worse than I realized.
We still have lots of time before we decide if we are going to try again. Meanwhile we'll let the undomesticated pollinators do their thing.

Tuesday, November 21, 2017
Burn Piles
We have several burn piles around, obviously from our selective logging from earlier this year. Now that burn season is back in force it's time for us to get busy burning!
We are keeping the piles small, cleaning up little areas at a time. We almost had an incident earlier this year and had an unintentional tree loss because a burn pile got a little big. Enough said about that.

If you look at the picture you can see a pile behind the fire and another bigger pile on the right. We'll probably pull some bigger logs out of the bigger piles to make firewood before burning the not so big stuff.
This is going to take a while.
Monday, November 20, 2017
A Little More Cement
When we had the final third of the shop floor cemented we also decided to have a piece next to the garage driveway cemented. There was a small tree and a big bush in that corner with a faucet behind all that on the wall. Very awkward to get to. I can't count the times I banged my head on one of the stupid branches from not bending over enough to get to the faucet.
Bill got the backhoe and removed the bush and the tree.

He only left one minor scrape in the wall (see next to the rake).

Now it looks cleaner, we have more room to park, and it's definitely more user friendly.

We replanted the bush and the tree in another area. The tree looks like it's going to make it but the bush unfortunately did not survive.
Friday, November 17, 2017
Shop Cement
One of the very first improvements we made to our new house here was to put a cement floor in the shop. When we moved in the shop had a gravel floor and was divided into three areas: the main shop, the "office", and the "tack room". These were rooms that the previous owner had plans for and had started to create but never really finished. The office had a plywood floor, and the tack room had cinder blocks everywhere, possibly in preparation to put a plywood floor in. There was very little electrical done, though wires had been run all around the two smaller rooms, with outlet boxes. There was only one plug in the office that had a pull chain light attached. The tack room had empty outlet boxes and wires going here and there. The only lighting in the big shop was two lights that shone straight down. They weren't very bright either.


The day came when the guys started to work on the shop. We decided to do the main shop first and once we tore the office and tack room out we would do that side. But that was for later.
The plan was to do it in two pours.


The first side is done.

Then they came back and did the same thing to the second side. The shop side, or 2/3 of the entire floor was now done.

Eventually we would rip out the walls to the office and the tack room, creating one large space. I don't have pictures of that but here is a picture of the finished floor and the new lights above.


It's been a huge improvement!
Wednesday, November 15, 2017
Paint Choices
I know these posts aren't exactly in order but this is what I'm working on now.
We recently and finally got the wall removed between the dining area and the living room. It was quite the ordeal. We had several bids ranging from $1600 to $5000! We chose one guy but it took him forever to get started. He seemed hesitant to do it because it was a supporting wall and we needed a beam to hold the weight. The most complicated thing about it was there were some pipes above that needed to be moved (only a little) to make way for the beam. Our contractor ordered the beam and still kind of kept putting it off. We got the distinct feeling that he was uncomfortable with the project. Finally we told him he didn't need to do it because we knew he was very busy and had a million other projects he was working on. I'm sure he could have done the job, but he actually seemed relieved that we fired him.
Our electrician came back in to put some more can lights in the dining area and living room. When he saw the opening still wasn't done he called a buddy of his who came out and said he could do it. He got to work the next day and within a couple of days the wall was gone and the beam was up. Yay! Then the wallboard went up and now it is time to paint the areas.
I already know what tile I want to use for the floor so I got two samples. One was a brownish grey and the other was a more whitewashed grey wood look porcelain tile. The floor may be a while before it's done but I wanted to make sure the paint coordinated.
The paint on the living room walls now is a very gross dirty mustard. The kitchen is a medium green. Now that the wall is gone the new paint is going to be one color throughout.
I learned from painting our other houses (and innumerable hours of DIY tv) that you need to take your time in picking out a paint color. The color will look different on different walls and during different times of the day. Also it will not necessarily look like the small chip once it's on the wall.
I got several sample jars and painted big squares on two opposite walls, and a section near the floor where I placed the sample tiles I had purchased.
We decided the tile on the left is too whitewashed looking (sorry Joanna Gaines). I liked the left tile because it looked more realistic to me and it had both brownish and grayish tones. I actually thought we would go with one of the top four paints, but after putting them on the wall I knew right away they were too dark. I went back and got four more samples the next day. Definitely better. The consensus was unanimous. We all decided to go with the second from the left on the second row. It's a Behr paint called "dove". It's not too dark, not too light, and goes well with the tile.

This is the opposite wall. You can see how the colors look different. They are in the exact same order as in the photo above.

I guess I'm going to be pretty busy this week.
Monday, November 13, 2017
Love Is In The Air
I looked out the window and saw a nice buck just strolling by. We haven't seen a lot of deer this close to the house lately, probably because the dogs are out a lot.

He seemed to be focused on something near the garden. Then we saw a doe meandering through. Now it makes sense. It is that time of the year, after all.


Somebody made a noise and they looked over.

Time to leave.

Friday, November 10, 2017
Master Bathroom Remodel
When we bought this house we knew it wasn't perfect. The problem was we had looked for so long to find something livable and within budget. We were getting tired of looking and we were losing hope that we would find anything that we could both agree on. He was all about the house, and was definitely not into any sort of diy remodeling, and I was not so fixated on the house but I insisted on getting some decent land. We had looked at this house the last time we lived here (before we moved to Prineville) but they wanted too much money at that time. We moved back to Roseburg and started our search again. After listing and delisting the house was listed again with a new realtor for a lower price. This time we made an offer and we got it.
One of the first things I wanted to do was fix the master bathroom. To me it was one of the most hideous things I've ever seen. It had a large double headed shower (no tub--I have to have a tub!) with glass block walls. Several of the blocks were cracked and even had mold and algae growing inside the blocks. There must have been a leak in the shower pan at one point because the floor tiles were uneven and not slanted properly toward the drain. Another clue to the leak problem was directly below, in the ceiling of the living room, was a patch of paint that didn't quite match the other ceiling paint.
The double sinks were nice but they are colored and I'm not really into colored sinks. Also the antiqued brass fixtures are not my thing.
The floor was not bad, a tile-looking vinyl that wasn't in too bad of shape. I'm guessing it was replaced when the leak in the shower floor was "fixed".
Finally the toilet was also in good shape. At least it's white.
The before pictures.


Ugly pinkish tile.


After we'd been in the house for a couple of months I decided to start looking for a home equity loan. I wasn't even sure if it would be possible to get one since we hadn't been there all that long. But on the other hand why not? We had a large down payment so really, the cash was there, in the house. And we were going to make the house more valuable with the improvements.
I checked with several banks and credit unions. Most would not touch it because it was "too rural", it was "more than 20 acres", or whatever else. I finally got a "yes" from Wells Fargo. That was before I found out they were in hot water from allegedly taking out loans in people's names without their knowledge. I was a little leary after learning that info but figured now that they were under the microscope they wouldn't dare do anything fishy.
I needn't have worried because everything went smoothly. We got our HELOC loan and started making improvements. I usually tell people the logging we did paid for the master bathroom. In reality we pulled money from the HELOC since it was readily there and I repaid it with the logging money.
We had a few contractors come out to give us a bid after we told them what we wanted. There is an interior design store here that gave us a great presentation, with a plan and sample materials. They weren't the least expensive but we decided to go with them.
We took their first plan home with us to make measurements. They had a separate shower and my beloved soaking tub, but it turns out that left only a tiny space for the double sinks and counters. We went back to the drawing board and another plan emerged where the shower and tub were in the same space. That worked out much better.
A start date and schedule was set. I have to say they pretty much stuck to schedule and there were only a few glitches.
The after pictures.

The bathtub/shower. The green tape is where they had a few minor fixes.

The only thing that stayed was the toilet.

After everything was done I got the final bills. The major thing I didn't understand was how the project lady figured the bill. She had said they charge 15% over what their contractors charge. I did the calculations based on the bills she provided and it wasn't adding up. She had some cockamamie way of doing it using 85%. Her figures were coming out higher than mine. We finally got it figured out and we ended up doing my way.
I love my new master bathroom. I love the tile, the deep soaking tub, the soft close cabinetry, the granite.
The master bedroom was next.
Thursday, November 9, 2017
New Location, New Chickens
When we moved from Prineville back to Roseburg it really hurt having to give up my chickens. I knew when we would finally find our new place I would get chickens again. But I learned that I would not have roosters again. I would just get a bunch of different breeds known for colorful egg laying and hardiness.
I had to figure out a good place to have the new coop and run (singular rather than plural, as in Prineville). I wanted them to be close to the house so it would be easy to keep an eye on them, gather eggs, feed and water them.
I settled on an area behind the house, in the area that used to be the previous owners' dog run. We had dismantled the fencing there and Bill scraped an area as flat as possible with the tractor. My plan was to make the run similar to how I did it before, with cinder block under the panel fencing that I would build. The run is about 16' x 17'. I also had to make the coop bigger, so I made it 4' x 6'. The other differences were I made the fencing panels with 1/2" square hardware cloth from top to bottom. And the next boxes were going to go inside the coop. I was also planning on having a netting material across the entire top of the run because of the multitude of hawks and other predators that could possibly climb the fence (raccoons come to mind...).
I built everything in the shop. Even though I had a plan on paper somehow I managed to mess up some walls. I don't know how it happened but I ended up swapping some walls and when I realized my mistake I had to make a new plan. It all worked out.


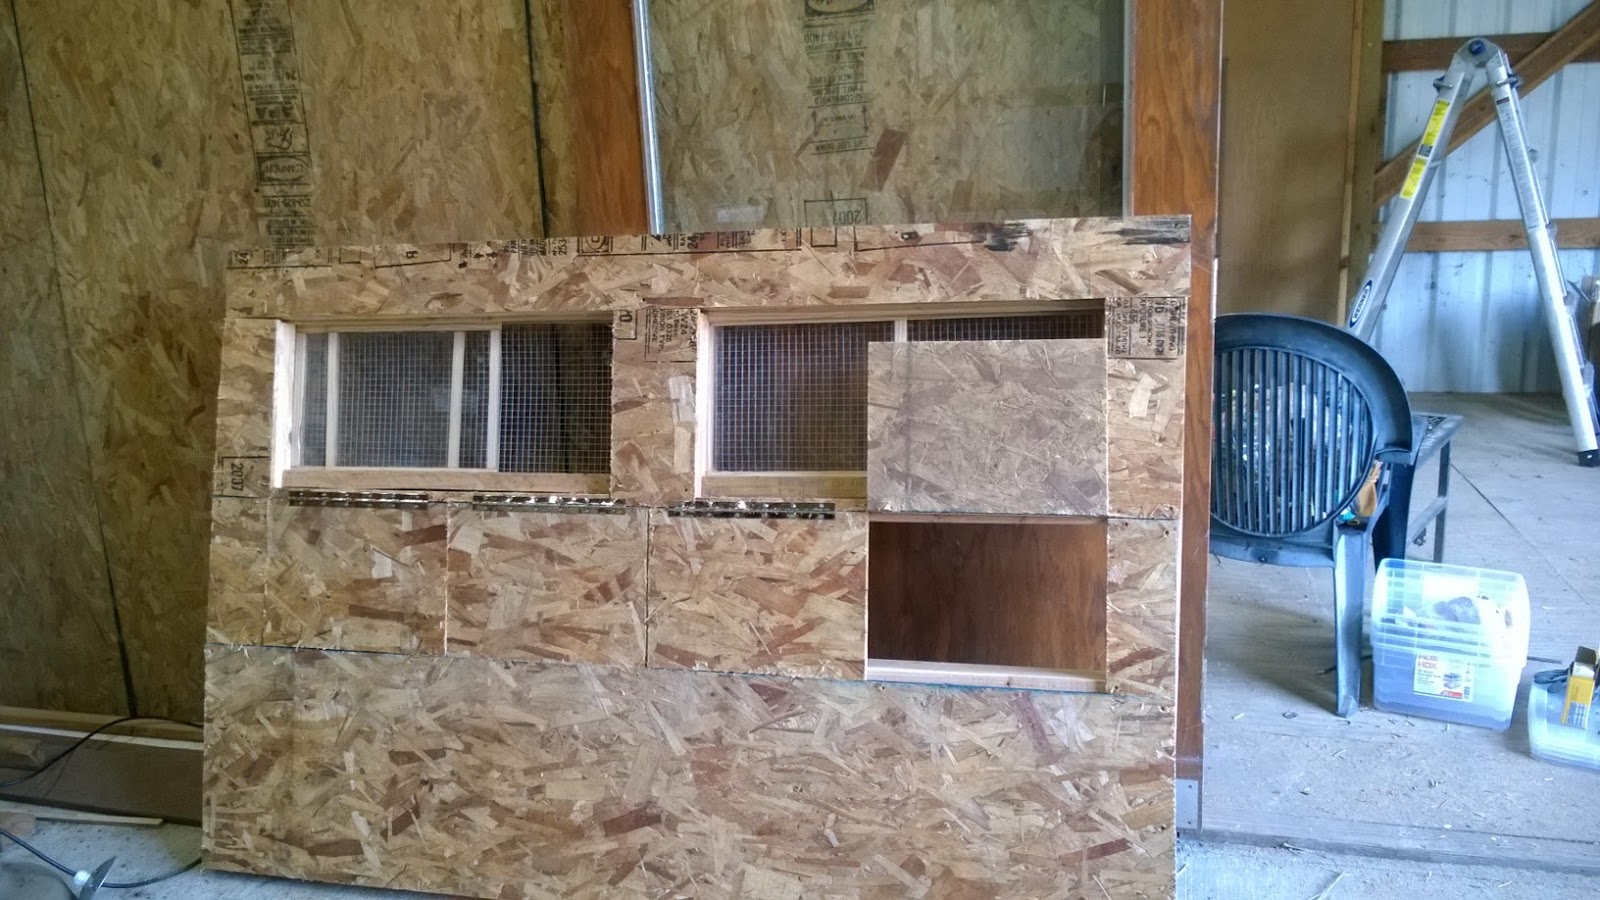
Another area I messed up. I originally had these sash type windows and this wall was going to be the end wall that would open to allow cleaning. It ended up being way too heavy so I made a new wall/door.

I tractored the pieces to the building site and started putting them together. The only problem I really had was getting the large door to hang properly, something I still have problems with. It does the job okay though, so I'm not fretting it. I enlisted the help of Bill, and friend Dave to help place the roof on.
Here is the interior before I built the nest boxes. The door for the chickens to go into the run is opposite.

What I had not anticipated being so difficult was digging the trench for the cinder blocks to go in. In Prineville the soil was rather sandy so it wasn't difficult. Here the ground is clay and it is virtually impossible to dig it out without heavy equipment. We got about two feet along but it was ridiculous so I filled it back in and decided to try and keep everything on top as best I could.
You would think that laying the blocks end to end and then making corners it should be easy to make the yard square. I did the best I could. Our son came to visit and I enlisted him to help me with the finishing touches. He helped put build some fence walls, put them all together, and then put the garden netting across the top of the yard.
I filled some of the cinder block holes with dirt and planted easy-care flowers. There are petunias, marigolds, some lavender, and some others I can't remember what they are.

Here you can see the new cleaning door.

Two sides don't have plants. Maybe next year.

I had my list of chickens that I wanted to order ready for a long time. I finally was able to order them and waited impatiently for them to arrive. My requested date was April 24. They arrived on April 26. Unfortunately there were a few casualties. I had 48 hours to report any further expirations. By the end of the 48 hours I had to report four deaths It may sound a bit morbid but because I couldn't tell which chick breeds were which I snapped photos of their little bodies which I sent to the company. They told me what they thought they were from the photos and refunded me.

This is when they were "teenagers". Some are easy to id, others were still not so much.


My granddaughter has become something of a "chicken whisperer". She has a few favorites that come running to her. She actually made a chicken harness that this one (blue splash marans) lets her put on and they go for a walk.


They started laying eggs right on schedule at six months of age. Not all of them, but at least 2 started laying regularly. They were green and light brown eggs. Then we started getting a dark green egg, and just recently we started getting blue eggs!

They aren't all laying yet but we are getting plenty.
I added a couple sheets of corrugated roofing. The rainy season is here now and the pen was getting really messy.
I am going to have to make one major change to the coop. I'll have to build the nest boxes so they are outside the coop (like in Prineville). With the boxes on the inside they get dirty way too fast because the hens won't roost on the roost I built for them but on the edge of nest box dividers.
My work is never done!
Subscribe to:
Posts (Atom)

