Wednesday, August 29, 2012

How To Make Cavalletti

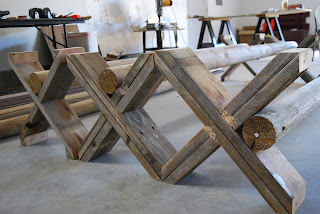
Cavalleti are training rails for horses. Traditionally they are on an "X" frame and can be turned to three different heights and can also be stacked to create different types of jumps, ie: vertical, oxer, or hogback.

I have a book by famous German rider Reiner Klimke, called "Cavalletti" that I got eons ago.  It is a great aid for training but oddly enough there are no real plans in the book on how to make your own.  I also did a search on-line and couldn't find anything like what I was looking for.  So I decided to make my own. I'm going to share my plans and you can also learn from my mistake(s).  ;-)

I had the lumber from the deck that we replaced so I thought that would be the perfect place to start.  These are 2 x 6 but I think 2 x 4 would work just as well.  I would have used 2 x 4's myself but like I said, I already had the 2 x 6.  As a side note you could also get a 4 x 4 which would essentially work the same with a bit less work, but the cost is a little more.

I measured and marked the boards at 2'2".  In retrospect I would make it 2'.  I knew I would have to cut some off the end and figured the extra 2" would cover it. Obviously I'm not an engineer and the part that is cut off doesn't shorten the board.  You'll see.

You'll need 4 pieces for each side, a total of 8 pieces for each cavalletti.

Cut the boards at your marks. To ensure I was getting the right spot I used the first cut board as an additional measure.

Each board then needs to be cut at a 45° angle on each end.  Make it a trapezoid, not a parrallelogram.

Match two pieces together so each end is a point, as shown.

You should have four pairs of boards.

Next, apply a generous amount of wood glue.

Clamp the matching pairs together. 

For extra security I added two screws on each end.

Let the boards dry overnight or at least for a few hours.  Now you have four pieces.

Measure and mark the middle from pointed end to pointed end of the top edge (where the seam is).  Measure how wide the top is (the short side).  Then take that measurement (it should be about 3" if you are using 2 x 4 or 2 x 6) and transfer to cover the center mark.  (It should be approximately 1 1/2" on either side of your center mark.)  Then bring the side marks down on either side to the middle of your board (on the wide side).  Be sure to do this on both sides.

Now you need to cut that marked portion out of your boards.

I tried a variety of tools for this and found that in the end the jigsaw worked the best.  The blade wasn't long enough to go all the way through but I simply cut one side, flipped the board and followed the lines on the other side and it worked great.  A bandsaw would be the best, but I don't have one.

After cutting out the chunk fit two pieces together to check for fit.  You may have to rasp or fill with glue and shims.  This is where careful measuring and cutting is beneficial.

Next attach your log to the cross pieces.  I used 4" X 8' round fence posts.  Round poles are recommended because if the horse hits it he will be less likely to cut himself on a sharp corner.  Make sure the end of the pole is even with the edge of the cross pieces.  I used two 1/4" x 6" long lag screws to secure the pole to the cross pieces.  I screwed them in so they were also in an X, one in one side of the X and the other in the other side of the X.

Here are a couple of the completed cavalletti.


In this picture you can see how the 45° angle allows the cavalletti to be stacked in different configurations.

This is a picture of the first one I made.  You can see I only used one board and if I had not added the extra triangles on each end I would not have been able to stack this particular model.

I've seen cavalletti for sale on line from $90 to $120 for one, not including shipping costs.  I estimate one would cost about $20 to make if you used two 2x4x8 ($2.60 ea); 4"x8' pole ($9); 4 1/4"x6" lag screws ($.95 ea).  

Let the fun begin!

Friday, August 24, 2012

Doing The Deck

When we went to the Home & Garden Show in Redmond earlier this year we stopped by a couple of painter booths to check out getting the deck done.  I think the last time it was sealed was when it was built.

One painting company just looked very pricey. They had an impressive display and explained how they first prepare the deck. First they sand everything using a massive sander that collects the sawdust, then powerwash. Everything else is protected by tarps and plastic wrap. They said their cost averages about $2/square foot.  For our deck that would be at least $2400.  A little over our budget.

The other booth we stopped at was the College Pro Painters. Their booth was definitely more sparse and there was only one young guy at a small table. He couldn't (or wouldn't) give us a round about figure so we made an appointment for him to give us an estimate.

When he came out he looked around he gave us his estimate of $665 or $750 if we included the pillars. That sounded pretty good. The catch would be we'd have to wait until late July or early August before he could come out. That's because of the weather. We had to make sure it wouldn't be rainy.

Finally he called and gave us a date for when he would come out. The first day he powerwashed everything and about a week later he would start the painting. We chose a solid color stain because otherwise the stain that was remaining would have shown through. (The deck was not sanded.)

Prior to the first painting day we decided to replace a few of the worst boards.

The old deck.  Hubby is sanding the top rail just to get it smoother for when it is painted.

We've got the new boards laid out and we are ready to get started.

 Screwing in a new board.

A few more to go.

The worst boards have been replaced.  Nothing to it!

Part of the deck painted.

I think Mr. College Pro Painter sorely miscalculated how much stain he would need.  He only had three gallons.  I think I would have started with at least five! 

Also for some unknown reason he was the only one that ever showed up. He said his "crew" were working on other paint jobs.  I also think he miscalculated how long it would take.

After the first day he managed to wrench his back putting his equipment away.  He didn't show up again for a whole week. Finally he came back, and had to return the next day because he ran out of stain again. About this time was when we told him we decided not to have the pillars done.

The deck is "done" now.  I guess you get what you pay for.  In my opinion its an okay job.  I don't think I would hire them again. We are going to buy a gallon of the stain and do some touching up in a few spots near the front of the house.  

Well, next time we know. But it should be good for a few years at least!

Tuesday, August 21, 2012

Cada Dia Cheese Tour

Today we went to Cada Dia Cheese farm and went on a little tour.  This is a small, family owned and operated cheese making business right here in Prineville.  

The farm is located in the north west part of town in a beautiful area of hay fields and pastures.

The house itself is really not too impressive from the first look.  The place is truly a work in progress.  Part of the house has been built using the straw bale practice.  The owner, Pat Sullivan, has the bales in place now and just needs to do the plaster.
  

At the back of the house is the milking parlor.  This is where the cows walk in to be milked.

The first room we entered after walking past the milking parlor was the wash up room.

Then we entered the room where the actual cheese making process begins.  

Here the curds and whey are being stirred and separated.

The curds are put into a form and pressed.  After about 24 hours or so the cheese is taken out of the molds and coated with a wax.  This is the owner, Pat Sullivan, waxing the newest cheddars.

There are two cheese rooms.  This is the cheddar room where the cheddar cheeses are being aged.

And in another room the camemberts are ripening.  The very new wheels are on the right and the older ones are on the left.

And of course the final stop was the "tasting room".  This was probably my personal favorite!!  We tasted saffron feta, chive cheddar, parmesan, "Christmas cheddar" (cheddar with chives and red pepper flakes), and triple cream camembert.

The young helper is a neighbor apprentice.  She was very sweet.

A few of the Jersey cows out in the pasture.

This is obviously far from the "modern" dairy farm one might think of when you think of a now-a-days-dairy farm.  But this is very close to how cheese was made hundreds of years ago.  

Let it be known that we bought a parmesan, triple cream camembert, and chive cheddar.  

YUM!

Sunday, August 19, 2012

Smoke

If you've been watching the news at all you know there are several large fires in Oregon/Idaho/Northern California.  In our Central Oregon location here we have had a couple of weeks of smokey skies.  Not just the skies but there has actually been the smell of smoke in the air. 


Fortunately we have not had any serious threats in the local area.  At least it's smoke and not smog!

Saturday, August 18, 2012

When Hubby Is Away...

I go into jump building mode!

Hubby had to go to CA for a quick trip last week and during his absence I added a few jumps to my collection.  The great thing was I used materials I already had on hand, so I didn't have to go to the store to buy any lumber.  All the wood I used was already here!

This was the first thing I made.  I'm not sure what you'd call it...maybe a flat topped coop?  

This particular beauty (the other side of the coop) was made from a terrible old cabinet I tore out of the shop.  When I took it out I had in mind that the pieces may be recyclable so I was careful not to break any of the large pieces. 

Next I found some cut juniper pieces near these tree trunks.  They were obviously forgotten when Hubby did all the tree limbing earlier this year. 

I spread them out between these trees and then lodged a board from another jump in the trunks.  The board made the other jump a little high for me, so it was no problem to scavange. 

I made this two rail upright using juniper trunks Hubby saved for me and scrap wood I saved.

Notice the superb building techniques!  A block and hole drilled above the block to hold either the bottom end or stick the top through the hole.  This way the pole length doesn't have to be exactly the same.

Then I found my old jump cups and tried to make something that could use them.  I cut the juniper posts evenly and voila!  

Everything may not look too professional right at the moment, but I was rather proud of myself that I didn't spend any money.  AND everything works!

I'm presently working on making some cavaletti (training poles that can be set at three different heights and stacked to be used as jumps).  My first attempt wasn't too bad but then I realized I made a slight mistake.  

I'll report on those when I get them finished.

Saturday, August 11, 2012

Chips

As in chipmunks.  They are our latest pest.  Cute as they are they can be as destructive as mice or rats.

They must have some sort of super power!

Look how they are clinging to the side of the wall.


They just climbed the wall like they were walking on the flat ground.  Amazing!

And speaking of amazing, I wonder how many chipmunks you'd have to have to make a nice lightweight jacket for fall!