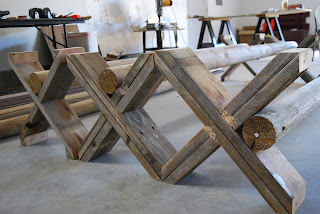
Cavalleti are training rails for horses. Traditionally they are on an "X" frame and can be turned to three different heights and can also be stacked to create different types of jumps, ie: vertical, oxer, or hogback.
I have a book by famous German rider Reiner Klimke, called "Cavalletti" that I got eons ago. It is a great aid for training but oddly enough there are no real plans in the book on how to make your own. I also did a search on-line and couldn't find anything like what I was looking for. So I decided to make my own. I'm going to share my plans and you can also learn from my mistake(s). ;-)
I had the lumber from the deck that we replaced so I thought that would be the perfect place to start. These are 2 x 6 but I think 2 x 4 would work just as well. I would have used 2 x 4's myself but like I said, I already had the 2 x 6. As a side note you could also get a 4 x 4 which would essentially work the same with a bit less work, but the cost is a little more.
I measured and marked the boards at 2'2". In retrospect I would make it 2'. I knew I would have to cut some off the end and figured the extra 2" would cover it. Obviously I'm not an engineer and the part that is cut off doesn't shorten the board. You'll see.
You'll need 4 pieces for each side, a total of 8 pieces for each cavalletti.
Cut the boards at your marks. To ensure I was getting the right spot I used the first cut board as an additional measure.
Match two pieces together so each end is a point, as shown.
You should have four pairs of boards.
Next, apply a generous amount of wood glue.
Clamp the matching pairs together.
For extra security I added two screws on each end.
Let the boards dry overnight or at least for a few hours. Now you have four pieces.
Measure and mark the middle from pointed end to pointed end of the top edge (where the seam is). Measure how wide the top is (the short side). Then take that measurement (it should be about 3" if you are using 2 x 4 or 2 x 6) and transfer to cover the center mark. (It should be approximately 1 1/2" on either side of your center mark.) Then bring the side marks down on either side to the middle of your board (on the wide side). Be sure to do this on both sides.
Now you need to cut that marked portion out of your boards.
I tried a variety of tools for this and found that in the end the jigsaw worked the best. The blade wasn't long enough to go all the way through but I simply cut one side, flipped the board and followed the lines on the other side and it worked great. A bandsaw would be the best, but I don't have one.
After cutting out the chunk fit two pieces together to check for fit. You may have to rasp or fill with glue and shims. This is where careful measuring and cutting is beneficial.
Next attach your log to the cross pieces. I used 4" X 8' round fence posts. Round poles are recommended because if the horse hits it he will be less likely to cut himself on a sharp corner. Make sure the end of the pole is even with the edge of the cross pieces. I used two 1/4" x 6" long lag screws to secure the pole to the cross pieces. I screwed them in so they were also in an X, one in one side of the X and the other in the other side of the X.
Here are a couple of the completed cavalletti.
In this picture you can see how the 45° angle allows the cavalletti to be stacked in different configurations.
This is a picture of the first one I made. You can see I only used one board and if I had not added the extra triangles on each end I would not have been able to stack this particular model.
I've seen cavalletti for sale on line from $90 to $120 for one, not including shipping costs. I estimate one would cost about $20 to make if you used two 2x4x8 ($2.60 ea); 4"x8' pole ($9); 4 1/4"x6" lag screws ($.95 ea).
Let the fun begin!


4 comments:
Holey cow- you are an engineering genius! Or at least a woodworking wonder! I never would have thought of gluing, notching, 45 degree angles and would have been scratching my head wondering why the darn things didn't do what they were supposed to do.
mt
Honestly, I was all excited after reading the title
OH BOY a pasta recipe!! A bit disappointed at first, but man, with these instructions I think I could make them!! They also look exactly like what the Germans put on the beaches at during WWII :0)
GOOD JOB TINA!!! You are so talented!!
Patti
Thank you for posting this. My daughter's getting more involved in horses through 4H, so there's tack and clothing to buy not to mention dirt to flatten, horses to feed and take care of. Oh, yeah. And we have to buy groceries for The Kid, too! So saving money by making our own has been super helpful!
Beautiful work, just what I looked for. Thank you 🥰 now I will start to build!
Post a Comment